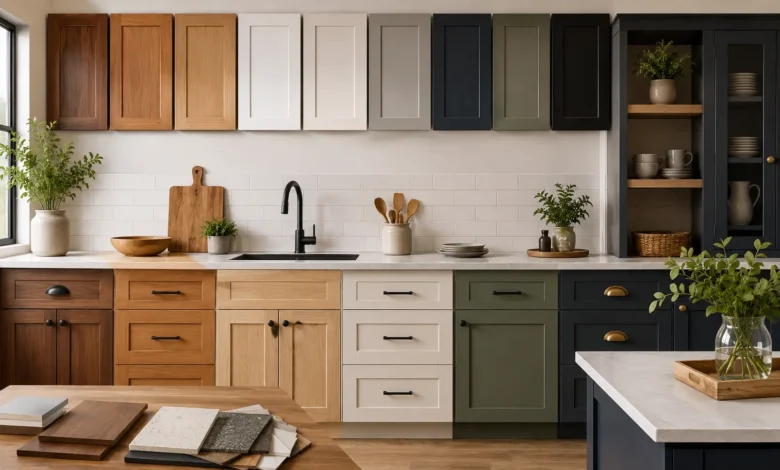
Cabinets usually take up the single largest share of a kitchen remodel budget, and they influence nearly every other decision in the room — countertop color, hardware finish, even lighting placement. Yet most homeowners spend far more time picking a paint color than they do understanding what’s actually inside a cabinet box. This guide breaks down materials, door styles, colors, hardware, painting, and storage so you can make a choice — or a refresh — that holds up for years, not just the first six months.
Why Cabinets Deserve the Most Planning Time
Cabinets are one of the few kitchen elements that are genuinely expensive and difficult to change later. A countertop can be swapped in a weekend; a full cabinet replacement means removing appliances, disconnecting plumbing and electrical, and often patching walls and flooring. Getting the construction quality, layout, and storage features right the first time avoids a much more disruptive (and expensive) redo a few years down the line.
It also helps to separate two different decisions that often get blurred together: how the cabinets are built (construction type and materials) and how they look (door style, color, and hardware). A budget-friendly stock cabinet can still look high-end with the right kitchen cabinet doors and kitchen cabinet handles, while an expensive custom cabinet built in the wrong style for your kitchen won’t necessarily look better.
Cabinet Construction Types
Stock cabinets
Stock cabinets come pre-manufactured in standard sizes, typically in 3-inch width increments, and are usually available at home improvement stores or through a kitchen retailer with a short lead time — often just a few days to a couple of weeks. They’re the most affordable option and a practical choice for standard-shaped kitchens without unusual dimensions or storage needs. The trade-off is limited flexibility: if your kitchen has an odd nook, a low ceiling, or a nonstandard appliance, stock cabinets may leave awkward gaps that need filler panels.
Semi-custom cabinets
Semi-custom cabinets start from the same base component system as stock cabinets but offer more choices in size, finish, door style, and interior storage accessories. Lead times run longer, typically four to eight weeks, and costs sit in the middle range. This is often the sweet spot for homeowners who want more flexibility than stock cabinets offer without paying full custom pricing.
Custom cabinets
Custom cabinets are built to the exact measurements and specifications of your kitchen by a cabinet maker or specialty shop. They make the best use of unusual layouts, tall ceilings, or specific storage requests, and they typically use higher-grade materials and joinery. The trade-offs are cost and lead time — custom orders can take eight to twelve weeks or longer, and pricing is significantly higher than stock or semi-custom options.
RTA (ready-to-assemble) cabinets
RTA cabinets ship flat-packed and are assembled on-site, often by the homeowner. They’re typically the least expensive option and can be a reasonable choice for a tight budget or a rental property, but quality varies enormously between brands, so it’s worth checking box material and joinery method (screwed and glued construction holds up better than stapled) before ordering.
Cabinet Materials
The material used for the cabinet box and the doors doesn’t have to match — many kitchens use a more affordable box material with a nicer door material, since the box itself is rarely visible.
Solid wood. The most durable and longest-lasting option, and the only material that can be sanded and refinished if it gets damaged years down the road. Solid wood is also the most expensive choice and can expand or contract slightly with humidity changes, which is worth considering in very dry or humid climates.
Plywood. A strong, stable material commonly used for cabinet boxes even in kitchens with a different door material. Plywood resists warping better than particleboard and holds screws and hardware more securely over time, making it a good indicator of overall build quality when comparing cabinet lines.
MDF (medium-density fiberboard). Made from wood fibers compressed with resin, MDF is smooth, consistent, and takes paint extremely well, which is why it’s the most common material for painted shaker or flat-panel doors. It’s less water-resistant than solid wood or plywood, so it’s worth avoiding directly beneath a sink without proper sealing.
Particleboard. The least expensive option, made from compressed wood chips and resin. It’s more prone to swelling if exposed to moisture and doesn’t hold screws as securely as plywood, making it a reasonable choice only for lower-budget projects or rarely used cabinets.
Thermofoil. A vinyl film heat-applied over an MDF substrate, offering a smooth, affordable, low-maintenance finish. Thermofoil can peel or bubble over time when exposed to heat, so it’s best kept away from cabinets directly next to the oven or range.
Laminate. A durable, budget-friendly surface applied over a particleboard or MDF core, available in a wide range of colors and patterns. It resists scratches and stains reasonably well but can show wear at edges and seams over time.
Kitchen Cabinet Doors: Styles and What They Signal
Door style has the biggest visual impact of any single cabinet decision, and it’s usually the fastest way to identify a kitchen’s overall design direction.
Shaker. A flat center panel surrounded by a simple, square frame. Shaker-style kitchen cabinet doors are the most popular style in the U.S. right now because they work across nearly every design aesthetic, from farmhouse to modern to transitional, and they tend to age well rather than looking dated after a few years.
Slab (flat-panel). A completely flat door with no frame or panel detail. Common in modern and minimalist kitchens, slab doors show fingerprints and smudges more easily on darker or glossier finishes, which is worth factoring in for busy households.
Raised-panel. A door with a recessed or raised center panel and more decorative detailing around the edges. This style leans traditional and pairs well with warmer wood tones and classic hardware.
Beadboard. Featuring vertical grooved lines across the panel, beadboard doors add texture and a cottage or farmhouse feel, often used selectively on an island or a run of lower cabinets rather than throughout the whole kitchen.
Glass-front. Cabinets with glass inserts instead of a solid door, used to break up long runs of cabinetry and display dishware. Glass-front cabinets require more consistent tidiness inside, since the contents are visible, and they’re usually used for a portion of the upper cabinets rather than the entire kitchen.
Louvered and reeded doors. Less common but growing in popularity, these add texture through vertical slats or fluted grooves. They work well as an accent — on an island or a bar cabinet — rather than across a full kitchen, since the texture is a strong visual statement in a large dose.
Kitchen Cabinet Colors: What to Consider Before You Choose
Kitchen cabinet colors set the tone for the entire room more than almost any other single decision, and unlike a wall color, they’re expensive and disruptive to change later — so it’s worth slowing down here.
White and off-white. Still the most common kitchen cabinet color because it’s flexible, brightens the room, and tends to appeal to the widest range of tastes if resale value is a consideration. Pure white can feel stark in rooms with little natural light, in which case a warmer off-white or cream often works better.
Warm neutrals. Greige, warm taupe, and soft beige tones have grown in popularity as an alternative to stark white, offering a similar brightening effect with more warmth and less of a clinical look.
Deep, saturated colors. Navy, forest green, and charcoal have become common choices, especially on an island or a lower run of cabinets paired with lighter uppers. These colors add contrast and personality but show dust and water spots more visibly than lighter tones, and they can make a small or dark kitchen feel more closed-in if used on every cabinet.
Two-tone cabinets. Pairing one color on the lower cabinets and a different (usually lighter) color on the uppers is one of the most requested kitchen cabinet ideas right now. It adds visual interest without committing to a single bold color throughout, and it can also help define a kitchen island as a distinct feature.
Wood tones as a “color.” Natural or stained wood cabinetry has made a comeback alongside painted cabinetry, often used selectively — a wood island among white perimeter cabinets, for example — to add warmth without a full commitment to an all-wood kitchen.
When choosing a color, it helps to test large sample boards in the actual kitchen at different times of day, since lighting direction and bulb temperature can shift how a color reads dramatically between a paint chip and the finished wall of cabinets.
Kitchen Cabinet Ideas by Design Style
Choosing a design direction first makes every other decision — door style, color, hardware — faster to narrow down.
Modern. Slab or minimal-profile doors, a neutral or monochrome palette, and handleless or minimal hardware. Modern kitchen cabinet ideas often lean toward integrated appliances and a flush, streamlined look with few visual breaks.
Traditional. Raised-panel doors, warmer wood tones or classic painted colors, and more ornate hardware like cup pulls or ornamental knobs. Crown molding and decorative end panels are common finishing touches in traditional cabinetry.
Transitional. Shaker doors, simple hardware, and a mostly neutral palette with one or two classic touches, such as a furniture-style island leg. Transitional design remains one of the most popular directions because it’s flexible and doesn’t feel tied to a specific trend cycle.
Farmhouse. Shaker or beadboard doors in white or soft colors, often paired with open shelving, a farmhouse sink, and natural materials like butcher block. Warm, worn-in hardware finishes like aged brass or oil-rubbed bronze tend to suit this style well.
Coastal or Scandinavian. Light, airy cabinet colors, simple door profiles, and minimal ornamentation, relying on natural light and clean lines rather than heavy detailing.
Kitchen Cabinet Hardware and Handles
Hardware is a relatively small cost that has an outsized effect on how finished a kitchen feels, and it’s one of the easiest kitchen cabinet ideas to change without a full remodel.
Knobs vs. pulls. Knobs generally work well on cabinet doors, while pulls (bar-style handles) tend to be more comfortable and practical on drawers, especially deep or heavy ones. Many kitchens mix both — knobs on doors, pulls on drawers — for a cohesive but slightly varied look.
Finish options. Popular kitchen cabinet hardware finishes include brushed nickel, matte black, brushed brass or gold, and oil-rubbed bronze. Finish consistency matters more than matching every fixture exactly — hardware, faucet, and lighting finishes don’t need to be identical, but they should feel like they belong in the same palette.
Sizing. Hardware should scale with the cabinet — oversized pulls on small drawers, or tiny knobs on large pantry doors, tend to look out of proportion once installed. As a general guideline, drawer pulls typically run about a third of the drawer’s width, centered.
Placement. On doors, knobs and pulls are typically mounted on the corner closest to the opening edge, roughly 2 to 3 inches from the top or bottom depending on whether the cabinet is upper or lower. Consistent placement across the whole kitchen makes a bigger visual difference than any single hardware choice on its own.
Budget impact. Swapping kitchen cabinet handles and knobs is one of the fastest, lowest-cost ways to update a kitchen’s look without touching the cabinets themselves, and it’s a common first step for anyone testing out a style change before committing to paint or new doors.
Kitchen Cabinet Painting: A Step-by-Step Overview
Painting existing cabinets is one of the most cost-effective ways to change a kitchen’s look, but kitchen cabinet paint only holds up well with proper preparation. Skipping steps is the most common reason a cabinet paint job looks great for a few months and then starts chipping.
- Remove doors, drawers, and hardware. Painting cabinets in place, without removing the doors, almost always results in a less even finish and drips in hard-to-reach corners.
- Clean thoroughly. Kitchen cabinets accumulate grease film even when they look clean, and paint won’t adhere properly over it. A degreasing cleaner followed by a rinse is worth the extra step.
- Sand or deglaze. Lightly sanding the surface (or using a liquid deglosser on cabinets you don’t want to sand) gives the primer something to grip. This step is often skipped and is one of the biggest reasons paint peels prematurely.
- Fill and repair. Wood filler on dents, dings, or gaps should be sanded smooth before priming, since primer and paint will highlight rather than hide surface imperfections.
- Prime. A bonding primer designed for cabinets — especially important on thermofoil, laminate, or previously stained wood — improves adhesion and paint durability significantly more than skipping straight to paint.
- Paint in thin, even coats. Two to three thin coats generally look better and last longer than one thick coat, which is more prone to drips, brush marks, and slow, uneven curing.
- Use the right paint type. A cabinet-specific enamel (often available in a hybrid alkyd or waterborne enamel formula) offers better hardness and washability than standard wall paint, which stays softer and marks more easily.
- Let it cure fully before rehanging. Paint can feel dry to the touch within a day but often needs one to three weeks to fully cure and reach its final hardness — rehanging and using cabinets too soon is a common cause of sticking or peeling at contact points.
For anyone weighing a full cabinet painting project against a professional refinishing service, the main trade-off is time versus cost: DIY kitchen cabinet painting saves money but takes far longer and carries more risk of an uneven finish, while professional spray-finishing typically produces a smoother, more durable result faster.
Corner Kitchen Cabinet Solutions
Corner cabinets are some of the most awkward — and most wasted — storage space in a typical kitchen, since a standard cabinet box can’t reach into the full depth of a corner without becoming unusable.
Lazy Susans. A rotating shelf system, either a full circle or a kidney shape, that lets you spin stored items into reach instead of digging into a blind corner. This remains the most common corner kitchen cabinet solution because it’s relatively affordable and works with a standard corner cabinet box.
Diagonal corner cabinets. Installed at a 45-degree angle with a door that opens directly into the corner, these provide more straightforward access than a blind corner cabinet, though they typically offer less total storage volume than a lazy Susan setup.
Blind corner pull-out systems. A sliding or swinging mechanism that pulls storage out of the blind portion of a corner cabinet, which otherwise would be nearly inaccessible behind the cabinet next to it. These systems cost more than a basic lazy Susan but make significantly more of the corner’s storage usable.
Open corner shelving. In some layouts, replacing a lower corner cabinet with open shelving avoids the access problem entirely, trading some storage capacity for easier visibility and reach.
Corner drawers. A newer option in custom and semi-custom cabinetry, these use a specially shaped drawer box to make use of a corner without requiring a rotating or pull-out mechanism — generally the easiest corner solution to use, though it’s typically only available through custom or higher-end semi-custom cabinet lines.
Because corner cabinets are among the hardest to retrofit later, it’s worth deciding on a corner solution during the initial cabinet order rather than trying to add one after installation.
Kitchen Cabinet Organizers Worth the Upgrade
Beyond the cabinets themselves, a few interior storage features consistently make kitchen cabinets easier to live with day to day:
- Pull-out shelves and drawers in base cabinets eliminate kneeling and reaching into the back of a dark, deep cabinet.
- A dedicated pots-and-pans drawer near the stove is generally more practical than stacking cookware on fixed shelves.
- Corner cabinet organizers, such as a lazy Susan or a diagonal pull-out unit, recover storage space that standard corner cabinets typically waste (see the corner cabinet section above for a full breakdown).
- Vertical dividers for baking sheets, cutting boards, and trays keep flat items from becoming an unstable stack.
- A built-in trash and recycling pull-out keeps bins concealed and out of the main walking path.
- Spice pull-outs next to the range put seasonings within reach without cluttering the counter.
- Deep drawers instead of lower cabinets for everyday dishware are easier to access than reaching into a cabinet and stacking plates vertically.
- Tiered shelf organizers inside a standard cabinet make canned goods or spice jars visible instead of stacked and hidden behind each other.
- Under-sink organizers — trays, tension rods, or pull-out caddies — work around plumbing to make otherwise-wasted under-sink space usable for cleaning supplies.
These upgrades typically cost less than people expect relative to the overall cabinet budget, and they tend to matter more for daily convenience than door style or color alone.
Also Read: Small Kitchen Design Ideas: How to Maximize Space in a Compact Kitchen
How to Choose Cabinets for Your Budget
- Set the overall kitchen budget first, then allocate roughly a third to cabinetry as a starting point — this share is often larger in budget-conscious remodels and smaller in kitchens with high-end appliances or countertops competing for budget.
- Decide between stock, semi-custom, and custom based on how standard your kitchen’s dimensions are and how much lead time you can accommodate.
- Choose a door style, color, and hardware that matches your kitchen’s overall design direction, since this affects resale appeal as much as personal preference.
- Prioritize organizers in the areas you use most — near the stove, sink, and main prep zone — rather than spreading upgrades evenly across every cabinet.
- Get an itemized quote that separates cabinet boxes, doors, hardware, and installation, so it’s clear where the budget is going and easier to compare quotes between suppliers.
- Consider painting before replacing if the existing cabinet boxes are structurally sound — kitchen cabinet painting can deliver much of the visual impact of new cabinets at a fraction of the cost.
Cabinet Maintenance Tips
- Wipe cabinet doors with a soft, damp cloth rather than abrasive cleaners, which can dull painted or stained finishes over time.
- Avoid excess water pooling near the sink base cabinet, since prolonged moisture exposure is one of the most common causes of swelling and damage.
- Tighten hinges and hardware periodically; loose hinges accelerate wear on the cabinet frame if left unaddressed.
- For painted cabinets, touch-up paint matched to the original finish can address small chips before they become more noticeable.
- Keep cabinets near the range clean of grease buildup, which can otherwise cause peeling on thermofoil or laminate finishes over time.
- Clean cabinet hardware occasionally with a mild soap and soft cloth, since fingerprints and grease residue build up on handles and knobs faster than on the cabinet surface itself.
Standard Cabinet Sizes and Sizing Basics
Understanding standard cabinet dimensions makes it easier to plan a layout and spot when a kitchen needs custom sizing.
- Base cabinets typically stand 34.5 inches tall (about 36 inches with a countertop) and 24 inches deep, with widths ranging from 9 to 48 inches in standard increments.
- Wall (upper) cabinets usually run 12 to 42 inches wide, 12 to 15 inches deep, and are commonly mounted 18 inches above the countertop, though this can vary based on ceiling height and appliance placement.
- Tall cabinets (used for pantries or built-in ovens) typically range from 84 to 96 inches tall to reach close to standard ceiling heights.
- Toe kick — the recessed space at the base of cabinets — is usually about 4 inches tall and 3 inches deep, and it exists to let you stand close to the counter without stubbing your toes.
If your kitchen has a lower or higher ceiling than standard, an unusual wall length, or a specific appliance that doesn’t match typical dimensions, this is usually the point where semi-custom or custom cabinets become worth the extra cost, since filler panels and awkward gaps become more noticeable in nonstandard spaces.
Common Cabinet Mistakes to Avoid
- Choosing finish before function. It’s tempting to pick a door style and color first, but deciding on storage needs — drawers vs. doors, corner solutions, pantry space — before finalizing the look avoids having to compromise on function later.
- Skimping on base cabinet storage. Base cabinets see the heaviest daily use, so it’s usually worth prioritizing pull-out shelves and drawers here over upper cabinet upgrades.
- Ignoring appliance clearances. Cabinet openings for a dishwasher, range, or refrigerator need to match the specific appliance’s dimensions, including door swing and ventilation space — measuring twice before ordering cabinets avoids costly rework.
- Overlooking the toe kick and crown molding budget. These finishing details are easy to forget when estimating costs but are needed to give the cabinets a finished, built-in look.
- Matching hardware finish too rigidly. Hardware doesn’t need to match every other metal finish in the room exactly — but going too matchy-matchy (or too scattered) are both common missteps worth avoiding.
- Underestimating lead time. Ordering cabinets without accounting for semi-custom or custom lead times can delay an entire remodel, since most other trades (countertop templating, backsplash, plumbing) wait on cabinet installation first.
- Skipping proper prep when painting. Rushing a kitchen cabinet painting project without cleaning, sanding or deglazing, and priming is the single biggest reason a fresh coat of paint chips or peels within months.
Frequently Asked Questions
What’s the difference between stock, semi-custom, and custom cabinets?
Stock cabinets come in standard pre-set sizes with the shortest lead time and lowest cost. Semi-custom cabinets offer more size and storage options at a mid-range price and lead time. Custom cabinets are built to your kitchen’s exact specifications, offering the most flexibility at the highest cost and longest lead time.
Are painted or stained cabinets more durable?
Stained wood cabinets generally hide minor scratches and wear better since the wood tone is close to the surface color, while painted cabinets can show chips more visibly. Both can last for decades with proper care; durability depends more on the underlying material (solid wood or plywood vs. particleboard) than on paint versus stain.
What is the most popular kitchen cabinet door style right now?
Shaker-style doors remain the most popular choice because they suit a wide range of design styles and tend to look current for years rather than trend-specific.
Is it worth paying extra for plywood cabinet boxes instead of particleboard?
In most cases, yes. Plywood is more resistant to moisture damage and holds screws and hardware more securely over the long term, which matters most in cabinets exposed to humidity, like those under the sink or near the dishwasher.
How much should cabinets cost in a kitchen remodel?
Cabinet costs vary widely based on construction type, material, and finish, but they typically represent the largest single line item in a full kitchen remodel budget. Getting itemized quotes from multiple suppliers is the most reliable way to compare pricing for your specific kitchen size and style.
Can I paint laminate or thermofoil cabinets?
Yes, but it requires a bonding primer specifically designed for slick, non-porous surfaces, along with thorough cleaning and light sanding or deglossing first. Without this prep, paint tends to peel off laminate and thermofoil surfaces much faster than off wood or MDF.
What’s the best corner cabinet solution for an existing kitchen?
For an existing corner cabinet, a retrofit lazy Susan or a blind corner pull-out system are usually the most practical upgrades, since both can often be added without replacing the cabinet box itself. Corner drawers and diagonal cabinets typically need to be planned into a new cabinet order rather than retrofitted.
How often should kitchen cabinet hardware be updated?
There’s no fixed timeline, but swapping handles and knobs is one of the lowest-cost ways to refresh a kitchen’s look, and many homeowners update hardware every several years or whenever finishes elsewhere in the kitchen (faucet, lighting) change.
Also Read: The Complete Kitchen Guide: Design, Layout, Appliances, and Care Tips for Every Home