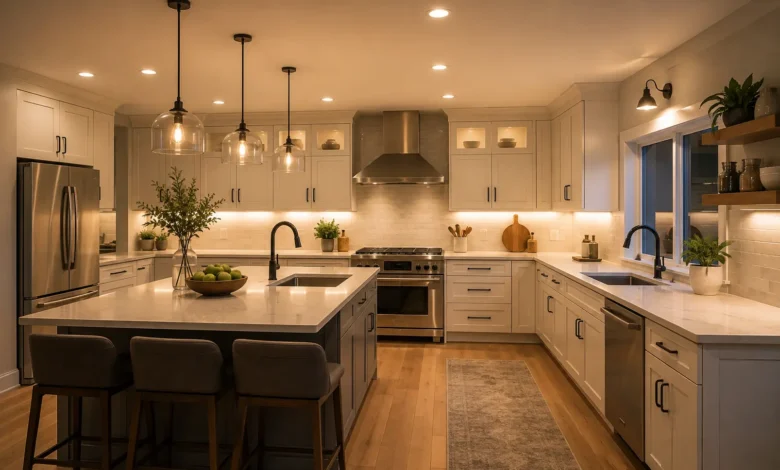
Kitchen lighting gets underestimated more than almost any other part of a kitchen design. It’s easy to assume one ceiling fixture will be enough, and then discover — once the room is finished — that the counter is dim, the sink area is shadowed, and the whole kitchen feels flatter than it should. Good kitchen lighting design isn’t about a single fixture; it’s about layering several types of light so every task in the room, from chopping vegetables to hosting guests, has the right light for the job.
This guide walks through the three lighting layers every kitchen needs, the fixture types available for each, placement guidelines that actually hold up in practice, and how to choose between LED, recessed, flush mount, and other common options.
Why Kitchens Need Layered Lighting
A kitchen handles more different activities than almost any other room — fine detail work like chopping and reading recipes, general movement and cleanup, and often relaxed conversation or entertaining. A single light source, no matter how bright, can’t serve all of these needs well on its own.
Lighting designers generally break a room’s lighting into three layers:
- Ambient lighting fills the whole room with general, even light.
- Task lighting targets specific work areas so you’re not working in your own shadow.
- Accent lighting highlights features and adds depth, without necessarily adding much functional brightness.
A kitchen that uses only ambient lighting — a single central fixture — tends to cast shadows exactly where they’re least wanted: over the counter, at the sink, and over the stove, since the cook’s own body blocks overhead light from reaching the work surface directly below. Layering solves this by bringing light in from multiple directions and heights.
Layer One: Ambient Kitchen Lighting
Ambient lighting is the base layer — the light that fills the room generally, rather than targeting a specific task. It sets the overall brightness level and mood of the kitchen.
Recessed kitchen lighting. Recessed lights (also called can lights or downlights) are mounted flush into the ceiling and have become the most common way to deliver ambient light in modern kitchens, since they provide even, unobtrusive coverage without taking up visual space. For general ambient coverage, recessed lights are typically spaced 4 to 6 feet apart across the ceiling, adjusted based on ceiling height and room size.
Flush mount kitchen lighting. Flush mount fixtures sit close to the ceiling rather than hanging down, making them a practical choice for kitchens with lower ceilings where a pendant or chandelier would hang too low. Flush mount kitchen lighting has also become more design-forward in recent years, with many fixtures offering decorative detailing rather than the plain round “boob light” style associated with older flush mounts.
Semi-flush mount fixtures. These hang slightly lower than a true flush mount but still sit closer to the ceiling than a pendant, offering a middle-ground option for kitchens with standard 8- to 9-foot ceilings that want a bit more visual presence than a flat flush mount.
Ceiling fixtures with multiple bulbs. A single fixture with several bulb points — a flush-mount cluster or a linear multi-light bar — can provide broader ambient coverage than a single-bulb fixture, especially useful in kitchens without recessed lighting.
Layer Two: Task Lighting for Kitchen Work Areas
Task lighting focuses light directly onto the surfaces where cooking, prepping, and cleaning actually happen.
Under-cabinet lighting. This is one of the single highest-impact upgrades in kitchen lighting design, illuminating the counter directly below upper cabinets where ambient light often can’t reach effectively. LED kitchen lighting strips are the dominant choice for under-cabinet installations today, since they run cool, use very little energy, and fit into the shallow space beneath cabinets far more easily than older fluorescent or halogen strip options.
Pendant lighting over an island or peninsula. Pendants hung 30 to 36 inches above the counter surface (roughly 66 to 72 inches from the floor) provide focused light for prep and also double as a design feature, since pendant style has become one of the most visible ways to add personality to modern kitchen lighting.
Sink lighting. A dedicated recessed light or a small pendant positioned directly above the sink prevents the cook’s own shadow from darkening this frequently used work area, which is a common shadow spot when relying only on general ambient lighting.
Range or cooktop lighting. Many range hoods include built-in lighting aimed down at the cooktop, but in kitchens without a hood (or with one that doesn’t include lights), a dedicated recessed fixture positioned above the range fills this gap.
In-cabinet or drawer lighting. Motion-activated LED strips inside deep drawers or dark pantry cabinets make it easier to find items without needing to prop the drawer fully open or use a phone flashlight.
Layer Three: Accent Kitchen Lighting
Accent lighting doesn’t carry much functional weight on its own — its job is to add depth, highlight a feature, and make the space feel more finished.
Interior cabinet lighting. Small LED lights placed inside glass-front cabinets illuminate displayed dishware or glassware, adding a soft glow that also functions as a form of ambient light in the evening.
Toe-kick lighting. LED strips installed along the base of cabinets create a low, ambient glow across the floor, which is both a design touch and a practical nightlight for late-night kitchen visits without flipping on the main lights.
Open shelving lighting. A small strip light mounted above or below open shelves highlights displayed items and adds warmth to what might otherwise be a visually flat section of wall.
Statement fixtures as accents. A sculptural pendant or an oversized chandelier over a kitchen table or island can function primarily as an accent piece — adding visual interest — rather than as the room’s main source of light.
Kitchen Lighting Fixture Types Compared
| Fixture Type | Best Layer | Typical Placement | Notes |
|---|---|---|---|
| Recessed lights | Ambient | Evenly spaced across ceiling | Most common choice for modern kitchen lighting; unobtrusive |
| Flush mount | Ambient | Center of room or over a specific zone | Good for low ceilings |
| Semi-flush mount | Ambient | Center of room | Slightly more visual presence than flush mount |
| Pendant lights | Task/Accent | Over island, peninsula, or sink | Doubles as a design feature |
| Under-cabinet LED strips | Task | Beneath upper cabinets | One of the highest-impact upgrades |
| Chandelier | Ambient/Accent | Over a kitchen table or large island | Statement piece, best for larger kitchens |
| Track lighting | Ambient/Task | Along a ceiling run, adjustable heads | Flexible, can redirect light as needed |
| Toe-kick LED strips | Accent | Base of cabinets | Nightlight function plus visual depth |
| In-cabinet lighting | Accent | Inside glass-front cabinets | Highlights displayed items |
Modern Kitchen Lighting Ideas
A few directions define what “modern kitchen lighting” tends to look like in current design:
Mixed fixture heights. Rather than relying on a single fixture type, modern kitchens often combine recessed ambient lighting with one or two statement pendants at a different height, creating visual layering that a flat, single-source ceiling doesn’t achieve.
Warm-to-neutral color temperatures. Kitchen lighting design increasingly favors a color temperature in the 2700K to 3000K range for a warm, inviting glow, sometimes paired with slightly cooler task lighting (3000K to 3500K) directly over prep areas for better visibility while chopping or reading recipes.
Linear and geometric fixtures. Rectangular or linear pendant and flush mount fixtures have grown in popularity over traditional round shapes, particularly over islands and long counter runs, echoing the clean lines common in modern kitchen cabinetry.
Dimmable everything. Dimmer switches on both ambient and accent layers let a kitchen shift from bright, functional daytime lighting to a softer, more relaxed evening mode without needing to install separate fixtures for each purpose.
Smart and app-controlled lighting. Smart bulbs and switches that adjust brightness and color temperature on a schedule or through voice control have become a common modern kitchen lighting upgrade, particularly for under-cabinet and toe-kick LED strips.
Matte and mixed-metal fixture finishes. Matte black, brushed brass, and warm bronze finishes on pendant and flush mount fixtures are currently more popular than the brighter chrome and polished nickel finishes that dominated kitchen lighting a decade ago.
LED Kitchen Lighting: What to Know
LED has become the default choice for nearly all kitchen lighting fixture types, and for good reason — but it’s worth understanding a few basics before choosing bulbs or fixtures.
Energy efficiency and lifespan. LED bulbs use significantly less energy than incandescent or halogen options and typically last tens of thousands of hours, meaning far less frequent bulb replacement, especially valuable for hard-to-reach recessed or under-cabinet fixtures.
Color temperature (measured in Kelvin). Lower numbers (2700K–3000K) produce a warm, yellowish light similar to traditional incandescent bulbs, while higher numbers (3500K–4000K) produce a cooler, whiter light. Most kitchens benefit from a warm-to-neutral range for ambient and accent lighting, with slightly cooler light acceptable directly over task areas where visibility matters most.
CRI (Color Rendering Index). This measures how accurately a light source renders colors compared to natural daylight, on a scale up to 100. For kitchens — where color accuracy matters for judging whether food is cooked properly or produce looks fresh — a CRI of 90 or higher is generally recommended, even though many standard LED bulbs are rated lower.
Dimmable LED compatibility. Not all LED bulbs and fixtures are dimmer-compatible, and pairing incompatible components can cause flickering or a limited dimming range. Checking that both the bulb and the dimmer switch are rated for LED use avoids this common installation issue.
Under-cabinet LED options. These generally come in two main types: puck lights (individual small fixtures) and LED strip lighting (a continuous flexible strip). Strips tend to provide more even, shadow-free coverage across a full run of cabinets, while puck lights can create slightly more distinct pools of light with gaps between them.
Kitchen Lighting Placement Guidelines
A few general placement rules hold up across most kitchen layouts and sizes:
- Recessed lighting spacing: Roughly 4 to 6 feet apart for even ambient coverage, adjusted for ceiling height — higher ceilings generally need lights spaced slightly closer or set to a brighter output to maintain even coverage at the counter level.
- Island pendant spacing: For multiple pendants over an island, space them evenly, typically 24 to 30 inches apart, centered over the island’s length rather than the room’s center if the island isn’t centered in the kitchen.
- Pendant height above counter: 30 to 36 inches above the counter surface is a standard starting point, adjusted based on the ceiling height and the specific pendant’s size and shape.
- Under-cabinet light placement: Mounted toward the front edge of the cabinet (rather than the back) directs light down onto the counter surface more effectively and reduces glare reflecting back up at the cook.
- Sink lighting: A single recessed light or small pendant centered directly above the sink is usually sufficient, positioned close enough that the cook’s own shadow doesn’t fall across the basin while working.
- Switch placement: Grouping switches for different lighting layers (ambient, under-cabinet, accent) on separate switches or a smart control panel makes it easier to use only the light needed for a given task, rather than defaulting to “everything on.”
Kitchen Lighting Design Mistakes to Avoid
- Relying on a single ceiling fixture. This is the most common kitchen lighting mistake, and it almost always results in shadowed counters and work areas.
- Skipping under-cabinet lighting. Even a well-lit kitchen can leave the counter directly under upper cabinets dim without this dedicated task layer.
- Choosing color temperature by feel alone. Mismatched color temperatures between fixtures (some warm, some cool) can make a kitchen feel visually inconsistent; sticking to one consistent range, or intentionally pairing warm ambient with slightly cooler task lighting, avoids a mismatched look.
- Undersizing or oversizing pendants. A pendant too small for the island looks lost, while one too large can overwhelm the space and block sightlines across the counter.
- Ignoring dimmers. Without dimming capability, a kitchen is often stuck choosing between too bright and too dim, since most kitchens need different brightness levels for cooking versus relaxed evening use.
- Forgetting accent lighting entirely. While not essential to function, skipping accent lighting is one of the easiest ways a finished kitchen can feel flatter and less polished than it could.
Planning a Kitchen Lighting Layout Step by Step
- Map the work zones. Identify where prep, cooking, cleanup, and any seating areas fall in the kitchen, since each needs its own task lighting consideration.
- Plan ambient coverage first. Lay out recessed or flush mount fixtures to provide even general lighting across the whole room before adding task and accent layers.
- Add task lighting to each work zone. Under-cabinet lighting for counters, a fixture over the sink, and pendants or additional recessed lights over an island or range.
- Layer in accent lighting. Toe-kick lights, in-cabinet lighting, or a statement fixture add the finishing visual depth once the functional layers are covered.
- Choose consistent (or intentionally paired) color temperatures across fixtures so the finished kitchen doesn’t feel visually mismatched.
- Add dimmers and separate switching for each layer, allowing the lighting to adjust from full task brightness to a softer evening mode.
- Confirm electrical capacity and placement with an electrician before installation, particularly for recessed lighting layouts and any new circuits needed for under-cabinet or accent lighting.
Working Natural Light Into the Kitchen Lighting Plan
Artificial lighting layers matter most, but natural light should factor into the overall kitchen lighting design too, since it changes how much artificial light is actually needed during the day.
- Position task lighting to complement window placement, not duplicate it. If a window already lights the main prep counter well during the day, under-cabinet lighting becomes primarily an evening and overcast-day feature rather than a constant necessity.
- Account for direction. North-facing kitchens receive more consistent, cooler daylight, while south-facing kitchens get stronger, warmer light that shifts more dramatically through the day — both affect how artificial light color temperature reads against natural light at different times.
- Avoid placing the sink or main prep zone entirely outside natural light where avoidable, since these are the areas where good visibility matters most, and relying on artificial light alone during the day is less pleasant than even a small amount of daylight supplementing it.
- Skylights or a window over the sink can dramatically reduce daytime reliance on ambient fixtures, and are worth considering during a larger renovation if the kitchen currently lacks natural light at its main work areas.
Kitchen Lighting Ideas by Kitchen Size and Layout
Small kitchens. Prioritize under-cabinet and recessed lighting over a large statement fixture, which can visually overwhelm a compact room. A single well-placed pendant, if used at all, works better than a full multi-light chandelier. For more layout-specific small kitchen strategies, see our full Small Kitchen Design Ideas: How to Maximize Space in a Compact Kitchen guide.
Galley kitchens. With two narrow counter runs, under-cabinet lighting on both sides is especially valuable, since a single central ceiling fixture struggles to evenly light two separated work areas. Recessed lighting spaced along the length of the galley, rather than clustered in the center, gives more even coverage.
Open-concept kitchens. Since these kitchens flow into a living or dining space, lighting often needs to work harder to visually define the kitchen zone. A distinct pendant style or a slightly different color temperature over the kitchen area, compared to the adjoining space, can help separate the zones without a physical wall.
Kitchens with islands. Islands typically warrant their own dedicated lighting layer — usually pendants — separate from the room’s general ambient lighting, both for task function and because the island is often the visual focal point of the room.
U-shaped and larger kitchens. With more wall area and multiple work zones, larger kitchens benefit most from a full layered approach: ambient recessed lighting throughout, task lighting at each distinct zone (sink, range, prep, island), and accent lighting to keep the larger space from feeling flat or overly uniform.
Kitchen Lighting on a Budget
A full kitchen lighting overhaul isn’t always necessary to meaningfully improve how a kitchen looks and functions. A few ways to prioritize on a limited budget:
- Start with under-cabinet lighting. This is consistently the highest-impact, lowest-cost upgrade in kitchen lighting design, and adhesive or plug-in LED strip kits can be installed without an electrician in many cases.
- Swap bulbs before swapping fixtures. Moving to warm-white LED bulbs with a higher CRI rating can meaningfully improve how a kitchen looks under its existing fixtures, at a fraction of the cost of replacing them.
- Add a single statement pendant over an island or sink rather than replacing every fixture in the kitchen — one well-chosen piece can update the room’s overall feel.
- Install a smart dimmer switch on an existing fixture instead of purchasing a new dimmable fixture outright, which is often a lower-cost way to add dimming control.
- Save recessed lighting additions for a larger renovation, since adding new recessed cans typically requires electrical and ceiling work that’s more cost-effective to do alongside other planned construction.
Kitchen Lighting Maintenance
Even well-planned kitchen lighting needs occasional upkeep to keep performing well:
- Clean fixtures periodically. Grease and dust accumulate faster in kitchen light fixtures than in most other rooms, and buildup can noticeably dim output over time, particularly on recessed light trims and under-cabinet strip covers.
- Replace bulbs with matching color temperature and CRI. When a single bulb burns out in a multi-bulb fixture, replacing it with a mismatched color temperature can create an uneven look until all bulbs in that fixture are eventually replaced together.
- Check LED strip connections. Under-cabinet and toe-kick LED strips are typically connected with small clip or plug connectors that can loosen over time, causing flickering or dark sections — reseating these connections is usually a simple fix.
- Inspect dimmer compatibility after bulb changes. Switching bulb brands or types within a dimmable fixture can occasionally introduce flickering if the new bulb isn’t rated for the existing dimmer, which is worth checking before assuming a fixture itself has failed.
- Recheck smart lighting settings periodically, since scheduled brightness or color-temperature changes tied to a smart system can drift out of sync with actual daily routines over time, especially after clock changes or software updates.
Frequently Asked Questions
How many recessed lights does a kitchen need?
It depends on the kitchen’s size and ceiling height, but a common starting point is spacing recessed lights 4 to 6 feet apart across the ceiling for even ambient coverage, then adding task lighting separately for counters, the sink, and the island.
What is the best color temperature for kitchen lighting?
Most kitchens work well with a warm-to-neutral range between 2700K and 3000K for ambient and accent lighting, with task lighting over prep areas sometimes set slightly cooler (3000K to 3500K) for better visibility while working.
Is LED lighting worth it for a kitchen?
Yes, in most cases. LED kitchen lighting uses significantly less energy, lasts far longer than incandescent or halogen bulbs, and is available in nearly every fixture type, from recessed cans to under-cabinet strips, making it the practical default for most kitchen lighting projects today.
How high should pendant lights hang over a kitchen island?
Pendant lights are typically hung 30 to 36 inches above the counter surface, which usually places the bottom of the fixture around 66 to 72 inches from the floor, though this can be adjusted based on ceiling height and the specific fixture’s size.
Do I need under-cabinet lighting if I already have recessed ceiling lights?
Generally, yes. Recessed ceiling lights provide ambient coverage but often can’t fully illuminate the counter directly beneath upper cabinets due to the angle of the light and the cook’s own shadow. Under-cabinet lighting fills this specific gap.
What’s the difference between flush mount and semi-flush mount kitchen lighting?
Flush mount fixtures sit directly against the ceiling with no gap, making them a good fit for low ceilings. Semi-flush mount fixtures hang slightly lower on a short stem, offering a bit more visual presence while still sitting closer to the ceiling than a full pendant.
Should kitchen lighting be on a dimmer?
In most cases, yes. Dimmable kitchen lighting allows the room to shift between bright, functional lighting for cooking and prep and a softer, more relaxed level for evening use or entertaining, without needing separate fixtures for each purpose.
Also Read: The Complete Kitchen Guide: Design, Layout, Appliances, and Care Tips for Every Home