
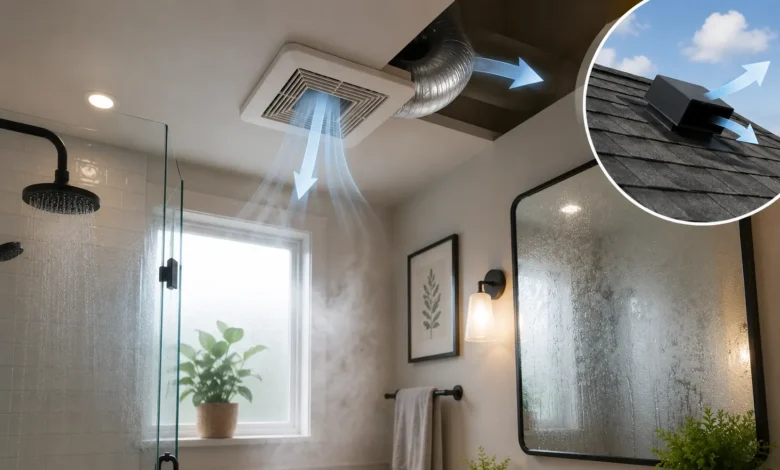
Of every room in a house, the bathroom generates more moisture in a shorter amount of time than almost anywhere else. A single hot shower can push humidity levels well above what the rest of the home experiences, and without a way for that moisture to escape, it settles into walls, ceilings, grout, and cabinetry, where it becomes the perfect environment for mold and mildew to take hold. Proper bathroom ventilation is one of the least glamorous parts of bathroom design, but it’s arguably the single most important factor in keeping the room healthy and structurally sound over the long term.
This guide covers everything homeowners need to understand about bathroom ventilation: how exhaust fans work, how to size one correctly, what the different venting requirements mean, and the daily habits that prevent moisture damage before it starts. Whether you’re troubleshooting an existing mold problem or planning ventilation into a new renovation, this guide will walk you through what actually works.
Why Bathroom Ventilation Matters More Than Most Homeowners Realize
Moisture damage in a bathroom rarely announces itself immediately. It builds slowly, behind walls and under flooring, long before it becomes visible as a stain, a musty smell, or peeling paint. By the time mold is visible on a ceiling or around a shower surround, it’s often already established in areas that aren’t visible at all, including inside wall cavities and beneath flooring.
This slow, hidden progression is exactly why ventilation deserves more attention than it typically gets. A bathroom without adequate ventilation doesn’t just risk cosmetic issues like peeling paint or discolored grout — over time, trapped moisture can compromise drywall, warp wood trim and cabinetry, corrode metal fixtures, and in more serious cases, contribute to structural wood rot. Beyond the property damage, mold growth can also affect indoor air quality, which is a legitimate health consideration for households with allergies, asthma, or other respiratory sensitivities.
The core principle behind bathroom ventilation is simple: warm, moist air needs a path out of the room faster than it can be absorbed into surrounding surfaces. Every strategy covered in this guide, from fan sizing to daily habits, exists to support that single goal.
How Exhaust Fans Actually Work
A bathroom exhaust fan pulls humid air out of the room and vents it, ideally, directly to the outdoors. Understanding the basic mechanics helps explain why some fans perform poorly even when they seem to be running correctly.
The fan draws air in through a grille, usually mounted on the ceiling, and pushes it through ductwork that should lead outside the home, typically through a roof vent or a wall-mounted vent cap. As that air moves out, it creates negative pressure in the bathroom, which pulls in slightly drier air from the rest of the house through the gap under the door, keeping a continuous flow moving through the room rather than letting humid air simply sit and settle.
This is also where many bathroom ventilation systems fail, even in homes with a working fan. If the ductwork is too long, has too many bends, or terminates in the attic rather than outdoors, the fan may be running but failing to actually remove moisture from the home. In these cases, the fan pulls air out of the bathroom, but that moisture simply relocates to the attic, where it can cause a different, often less visible, mold and moisture problem in a space most homeowners rarely inspect.
Sizing Your Exhaust Fan Correctly
One of the most common ventilation problems isn’t a missing fan — it’s an undersized one. A fan that’s too small for the room will run continuously without ever fully clearing the humidity a shower generates, which defeats much of its purpose.
Fan capacity is measured in cubic feet per minute, commonly abbreviated as CFM, which describes how much air the fan can move in a minute. A widely used guideline among contractors is to provide at least 1 CFM of fan capacity for every square foot of bathroom floor space, with a practical minimum of 50 CFM even in a very small bathroom, since fans below this threshold generally struggle to clear humidity effectively regardless of the room’s size.
For bathrooms with additional moisture sources, like a separate soaking tub, a steam shower, or a larger walk-in shower, it’s worth sizing up beyond the basic square-footage calculation, since these features generate meaningfully more humidity than a standard shower does. Many manufacturers publish sizing charts specific to their fan models, and it’s worth checking these directly rather than relying solely on the general square-footage rule, particularly for larger or more moisture-intensive bathrooms.
It’s also worth paying attention to a fan’s sound rating, measured in sones, alongside its CFM rating. A fan that’s technically powerful enough but uncomfortably loud is less likely to actually get used consistently, which undermines its effectiveness regardless of its rated capacity. Many newer fan models are engineered to be significantly quieter than older units while still delivering adequate airflow, which is worth factoring into a replacement decision even if the old fan’s capacity was sufficient.
Also Read: Small Bathroom Design Ideas: How to Make a Compact Space Feel Bigger
Venting to the Outdoors: Why It’s Non-Negotiable
As mentioned above, a bathroom exhaust fan only works as intended if its ductwork actually terminates outside the home. Venting into an attic, a crawl space, or simply leaving ductwork disconnected within a wall cavity is a surprisingly common issue, particularly in older homes or homes where a previous renovation cut corners on this specific detail.
Proper venting typically routes ductwork either straight up through the roof to a dedicated roof vent cap, or horizontally through an exterior wall to a wall-mounted vent cap. Both approaches work well when installed correctly, and the right choice generally comes down to the bathroom’s location within the house and how directly it can reach an exterior wall or roof section.
If you’re unsure whether your existing bathroom fan vents outdoors, this is worth checking, particularly if you’ve noticed any signs of moisture or discoloration in your attic. A straightforward way to check is to look at the fan’s ductwork from the attic, if it’s accessible, and trace where it terminates. If it’s difficult to verify yourself, a licensed contractor or home inspector can confirm proper venting relatively quickly, and correcting improperly vented ductwork is a worthwhile investment given how much moisture damage it can prevent.
Using the Fan Correctly: Timing and Habits
Even a properly sized and correctly vented fan won’t do its job effectively if it isn’t used long enough or consistently enough. A few simple habits make a meaningful difference.
Running the fan during a shower is the obvious starting point, but the fan needs to continue running well after the shower ends, since humidity lingers in the air and on surfaces for some time afterward. A general guideline is to keep the fan running for at least 20 to 30 minutes after a shower or bath, which gives it enough time to clear the bulk of the residual humidity rather than shutting it off the moment the water stops.
Because remembering to turn the fan off after this window can be inconvenient, many homeowners find it easier to install a humidity-sensing fan or a timer switch. A humidity-sensing fan automatically activates once ambient moisture crosses a certain threshold and shuts off once the air returns to a normal humidity level, removing the guesswork entirely. A timer switch, a simpler and generally less expensive option, allows you to set the fan to run for a fixed duration — commonly 20, 30, or 60 minutes — after being switched on, ensuring it doesn’t get turned off prematurely even if you leave the bathroom right after showering.
For bathrooms without a window, running the fan consistently matters even more, since there’s no supplementary airflow from an operable window to help clear humidity between fan cycles.
Signs Your Bathroom Ventilation Isn’t Working
A few warning signs consistently indicate inadequate bathroom ventilation, and catching them early can prevent more significant, costly damage down the line.
Persistent condensation on mirrors, windows, or tile long after a shower has ended is often the earliest and most visible sign that moisture isn’t clearing the room quickly enough. A well-ventilated bathroom should see condensation clear within a reasonable window after the fan has been running, rather than lingering for an extended period.
A musty or mildew smell, even when no visible mold is present, often indicates moisture has settled somewhere out of sight, commonly behind walls, under flooring, or within cabinetry, and is one of the more reliable early indicators that ventilation isn’t adequately clearing the space.
Peeling or bubbling paint, particularly on the ceiling or upper walls where warm, moist air tends to collect, is a clear sign that humidity is being trapped rather than properly exhausted. Discoloration or staining on the ceiling directly above the shower area is a related and equally telling sign.
Visible mold or mildew, whether on grout lines, caulking, or drywall, is the most obvious sign of a ventilation problem, though by the time it’s visible, moisture has typically already been accumulating for some time. Addressing the underlying ventilation issue alongside any visible mold cleanup is essential, since simply cleaning visible mold without correcting the ventilation problem generally results in the mold returning.
Preventing Mold: Beyond the Exhaust Fan
While a properly functioning exhaust fan is the foundation of good bathroom ventilation, a few additional habits and design choices work alongside it to prevent mold and moisture damage.
Wiping down shower walls, glass doors, and the tub after each use significantly reduces the amount of residual moisture left to evaporate into the room, which in turn reduces the overall humidity load your ventilation system needs to clear. A squeegee kept in the shower makes this a quick, low-effort habit rather than a chore.
Leaving a small gap under the bathroom door, or using a door with a built-in vent grille, allows air to continue circulating into the room even when the exhaust fan isn’t actively running, which helps prevent humidity from becoming trapped in a fully sealed space.
Washing shower curtains, liners, and bath mats regularly prevents mildew from establishing itself in fabric, which tends to retain moisture longer than hard surfaces and can become a persistent source of musty odor if neglected.
Inspecting and refreshing caulk and grout periodically closes off small gaps where water can seep behind tile or fixtures, creating hidden pockets of trapped moisture that a fan alone can’t address, since the fan only clears airborne humidity, not water that’s already made its way behind a wall or under a fixture.
Using a portable dehumidifier as a supplement, particularly in a bathroom with chronically high humidity or inadequate fan capacity, can help manage moisture levels between fan cycles, though it shouldn’t be relied on as a substitute for a properly functioning, correctly vented exhaust fan.
Also Read: The Complete Guide to Bathroom Lighting: Layers, Placement, and Bulb Types
Windows and Natural Ventilation
In bathrooms with an operable window, natural ventilation can supplement — though not fully replace — a mechanical exhaust fan. Opening a window during and after a shower helps release humid air more quickly, particularly in mild weather when doing so doesn’t create a significant temperature swing in the room.
That said, natural ventilation alone is rarely sufficient as a bathroom’s sole moisture-control strategy, both because window use is weather-dependent and because many building codes now require mechanical exhaust ventilation in bathrooms regardless of whether a window is present, given how much more reliable and consistent a fan is compared to relying on outdoor conditions and homeowner habit alone.
For bathrooms with a window, it’s still worth running the exhaust fan as the primary moisture-control method, treating the window as a helpful supplement rather than the main line of defense, particularly during colder months when opening a window isn’t practical.
Types of Bathroom Exhaust Fans
Not all bathroom exhaust fans are built the same way, and choosing the right type for your bathroom can make a meaningful difference in both performance and noise level.
Ceiling-mounted fans are the most common type found in residential bathrooms, installed directly into the ceiling with ductwork running up through the attic or roof. These are widely available, straightforward to install or replace, and suit the vast majority of standard bathroom layouts.
Inline fans are mounted remotely, typically in the attic rather than directly in the bathroom ceiling, with only a grille visible in the room itself. Because the fan motor is located further from the room, inline fans tend to run noticeably quieter than standard ceiling-mounted units, which makes them a popular upgrade for homeowners who want strong airflow without the noise. They also make it easier to service one larger inline fan for two bathrooms in close proximity, rather than installing separate fans in each.
Fan-light combination units integrate a light fixture into the same housing as the exhaust fan, which simplifies installation in bathrooms where ceiling space is limited, though it’s worth confirming the fan portion is sized correctly rather than choosing the unit based on the light fixture alone.
Fan-heater combination units add a heating element to the fan housing, which some homeowners appreciate in colder climates for taking the chill off a bathroom during winter months, though these units typically cost more upfront and draw more electricity than a standard exhaust fan.
When replacing an existing fan, it’s worth confirming the new unit’s CFM rating and duct size are compatible with your bathroom’s existing ductwork, since mismatched duct sizing can reduce a new fan’s real-world performance even if its rated capacity is higher than the unit it’s replacing.
Building Codes and Ventilation Requirements
Most local building codes include specific requirements for bathroom ventilation, and understanding these requirements is useful both for renovation planning and for evaluating whether an existing bathroom’s ventilation meets a reasonable baseline standard.
In general, building codes require either a mechanical exhaust fan or an operable window meeting a minimum size threshold, though many jurisdictions have moved toward requiring mechanical ventilation regardless of window presence, given how much more consistent and reliable a fan is compared to relying on a window that may not always be usable. Some codes also specify minimum CFM requirements tied to bathroom size or fixture count, which generally align closely with the general sizing guidelines covered earlier in this guide.
If you’re undertaking a renovation that involves adding or relocating an exhaust fan, a permit is typically required, since the work involves both electrical wiring and, often, penetrating the roof or an exterior wall for the vent termination. It’s worth checking with your local building department before starting this type of project, both to confirm current requirements and to ensure the work is properly inspected and documented, which can matter later if you sell the home.
Even in situations where a permit or specific code requirement doesn’t strictly apply, such as a straightforward like-for-like fan replacement, following the general sizing and venting guidance in this article is still worth doing, since code minimums represent a baseline rather than necessarily the ideal setup for every household’s actual usage patterns.
Not every bathroom faces the same moisture load, and ventilation needs vary accordingly across different bathroom types.
Primary or en-suite bathrooms, which typically see the heaviest daily shower use, benefit from a correctly sized fan run consistently after every use, and are good candidates for a humidity-sensing fan given how frequently the room is used throughout the day.
Guest and hall bathrooms, used less consistently, still need adequate ventilation, but the risk of chronic moisture buildup is generally lower given less frequent use. That said, these bathrooms are sometimes more prone to neglect, since infrequent use can mean ventilation issues go unnoticed longer before anyone identifies a problem.
Basement bathrooms face a unique ventilation challenge, since basements tend to run more humid overall due to their below-grade location, less natural airflow, and, in many cases, less natural light. A basement bathroom benefits from a correctly sized exhaust fan just as much as any other bathroom, and in some cases, a dedicated dehumidifier for the broader basement space can help manage the baseline humidity level the bathroom’s ventilation system has to work against.
Powder rooms, without a shower or tub, generate far less moisture day to day, but they still benefit from basic ventilation, both for odor control and to manage the humidity generated by activities like handwashing, even though the ventilation demands are considerably lower than a full bathroom with a shower.
Common Ventilation Mistakes to Avoid
A handful of mistakes come up repeatedly in bathroom ventilation, and most are avoidable with a bit of upfront attention.
Choosing a fan based on price alone rather than correctly calculating the CFM the room actually needs often results in an underpowered fan that runs constantly without ever fully clearing humidity, which can end up costing more in the long run through mold remediation than a correctly sized fan would have cost upfront.
Venting into the attic instead of outdoors is one of the more serious mistakes, since it doesn’t eliminate moisture from the home — it simply relocates the problem to a less visible, harder-to-inspect space where damage can go unnoticed for a long time.
Turning the fan off too soon after a shower, before residual humidity has actually cleared, undermines much of the fan’s effectiveness even if it’s correctly sized and properly vented. This is one of the easiest mistakes to fix, either through a habit change or by installing a timer or humidity-sensing switch.
Neglecting fan maintenance, particularly failing to clean dust buildup from the fan’s grille and internal components, gradually reduces airflow over time, even though the fan appears to be running normally. A dust-clogged fan can lose a significant portion of its rated capacity, so periodic cleaning is worth including as part of regular bathroom maintenance.
Skipping ventilation altogether in a renovation to save on cost or complexity is a mistake that tends to become far more expensive later, once mold remediation, drywall replacement, or subfloor repair becomes necessary due to unaddressed moisture damage.
Maintaining Your Exhaust Fan Over Time
Like any mechanical component in a home, an exhaust fan benefits from periodic maintenance to keep performing at its rated capacity.
Cleaning the fan’s grille and interior blades every few months removes dust buildup that otherwise restricts airflow over time, and this is a simple task most homeowners can handle themselves after switching off power to the fan at the breaker.
Checking the fan periodically for unusual noise, such as a new rattling or grinding sound, can catch a failing motor or a loose component before it fails entirely, giving you time to plan a replacement rather than being caught without ventilation unexpectedly.
Most residential exhaust fans have a functional lifespan of roughly 10 years, though higher-quality models can last longer with regular maintenance. If your fan is approaching or beyond this age range, particularly if it’s noticeably less effective at clearing humidity than it used to be, it’s often worth proactively replacing it rather than waiting for a full failure, especially given how much cheaper a fan replacement is compared to addressing the mold or moisture damage that inadequate ventilation can eventually cause.
Frequently Asked Questions
How long should a bathroom fan run after a shower?
A general guideline is 20 to 30 minutes after a shower or bath, which gives the fan enough time to clear the bulk of the residual humidity in the room. A humidity-sensing fan or a timer switch can automate this so you don’t have to remember to turn it off manually.
What size exhaust fan do I need for my bathroom?
A common guideline is 1 CFM of fan capacity per square foot of bathroom floor space, with a practical minimum of 50 CFM even for very small bathrooms. Larger bathrooms, or those with a steam shower or soaking tub, may need more than this baseline calculation suggests.
Can a bathroom fan vent into the attic instead of outside?
No. Venting into an attic simply relocates humid air rather than removing it from the home, which can lead to mold and moisture damage in the attic instead of the bathroom. Ductwork should always terminate outdoors, either through a roof vent or a wall-mounted vent cap.
How do I know if my bathroom has a mold problem from poor ventilation?
Common signs include persistent condensation after showering, a musty smell even without visible mold, peeling or bubbling paint, and visible discoloration or mold on grout, caulk, or ceilings, particularly directly above the shower area.
Do I still need an exhaust fan if my bathroom has a window?
Yes. A window can supplement ventilation, but it isn’t a reliable substitute for a mechanical exhaust fan, both because window use depends on weather and time of year and because most building codes require mechanical ventilation regardless of window presence.
How often should a bathroom exhaust fan be cleaned or replaced?
The grille and interior components should be cleaned every few months to maintain airflow, and most fans have a functional lifespan of around 10 years, after which replacement is generally worth considering even without an obvious failure.
Preventing mold and moisture damage in a bathroom comes down to a combination of the right equipment and consistent habits: a correctly sized fan that vents properly to the outdoors, run long enough after every shower, paired with simple daily habits like wiping down wet surfaces and keeping caulk and grout in good repair. None of these individual steps require significant expense, but together they’re what stands between a bathroom that stays healthy for decades and one that quietly develops expensive, hidden moisture damage over time.
For more guidance on the rest of your bathroom project, explore these related guides: