If your plants are struggling and you’ve already ruled out watering and sunlight, the problem is almost always underground. Soil is the foundation every garden is built on, and even experienced gardeners sometimes overlook it in favor of fertilizer schedules and pest treatments. The truth is simpler and more powerful: get your soil right, and most other gardening problems become far easier to solve.
This guide walks you through exactly how to test your garden soil at home, how to read the results, and the specific steps to improve whatever type of soil you’re working with — whether it’s heavy clay, fast-draining sand, or something in between. For a broader overview of everything else that goes into a healthy garden, see our Complete Gardening Guide, which covers planning, planting, and maintenance from start to finish.
Why Soil Testing Matters More Than You Think
It’s tempting to skip straight to buying fertilizer when plants look unhealthy, but fertilizing without knowing your soil’s actual condition is a bit like guessing at a prescription without a diagnosis. Adding nitrogen to soil that already has plenty won’t fix yellowing leaves caused by a pH imbalance. Adding lime to soil that’s already alkaline will make the problem worse, not better.
Soil testing solves this by telling you exactly what your soil has too much of, too little of, and what its underlying structure looks like. That information turns garden troubleshooting from trial-and-error guesswork into a targeted plan. It also saves money over time, since you stop buying amendments your soil doesn’t need and start buying only what will actually move the needle.
Beyond fixing existing problems, testing before you plant a new bed helps you choose plants that are realistically suited to your soil, rather than fighting an uphill battle against conditions a particular plant was never going to tolerate well.
Understanding the Basics: What Makes Up Soil
Before testing, it helps to understand what you’re actually testing for. Garden soil is made up of a few key components:
- Mineral particles — sand, silt, and clay, in varying proportions, which determine your soil’s texture and drainage characteristics.
- Organic matter — decomposed plant and animal material that feeds soil biology, improves structure, and helps retain moisture and nutrients.
- Air and water — the pore space between particles, which roots and soil organisms depend on.
- Living organisms — bacteria, fungi, earthworms, and other microorganisms that break down organic matter and make nutrients available to plant roots.
A healthy soil test looks at several of these dimensions at once: physical texture, pH, nutrient levels, and often organic matter content. Together, they paint a full picture of what’s happening beneath the surface.
Step 1: Test Your Soil’s Texture
Texture refers to the ratio of sand, silt, and clay in your soil, and it’s the foundation everything else builds on. You can get a rough sense of your soil’s texture with two simple at-home tests.
The Jar Test
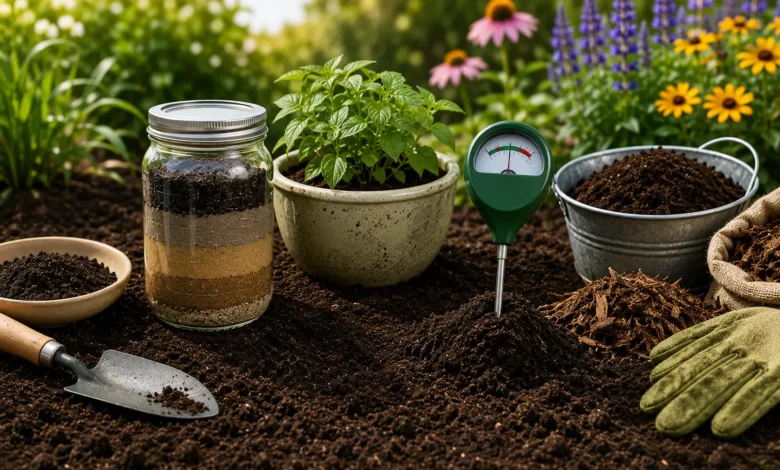
This is the classic DIY method, and it requires nothing more than a clear jar with a lid, water, and a soil sample.
- Collect soil from several spots in your garden, a few inches below the surface, and mix it together to get a representative sample.
- Remove any rocks, roots, or debris, and break up large clumps.
- Fill the jar about one-third full with soil, then fill the rest with water, leaving a little room at the top.
- Add a teaspoon of dish soap, which helps particles separate rather than clump together.
- Shake the jar vigorously for a minute or two, then set it down and let it settle undisturbed for 24 to 48 hours.
As the jar settles, particles separate by weight: sand sinks to the bottom first within a few minutes, silt settles on top of that over a few hours, and clay — the finest particle — settles last, sometimes taking a full day or two, with organic matter often floating on top. Once settled, you can measure the depth of each layer with a ruler and calculate rough percentages, which will tell you whether you’re working with sandy soil, clay soil, silty soil, or a balanced loam.
The Ribbon Test
For a faster, if less precise, read on your soil texture, try the ribbon test. Take a small handful of moist (not wet) soil and squeeze it between your thumb and forefinger, pushing it upward to form a ribbon.
- Sandy soil won’t hold together at all and falls apart immediately.
- Loamy soil forms a short ribbon, usually under an inch, before breaking.
- Clay soil forms a long, smooth, pliable ribbon that can extend two inches or more before breaking.
Neither test replaces a lab analysis, but both give you a genuinely useful starting point for understanding what you’re working with, at essentially no cost.
Step 2: Test Drainage
Poor drainage is one of the most common — and most fixable — causes of struggling plants, since waterlogged roots can’t access oxygen and are prone to rot. A simple percolation test tells you how well your soil drains.
- Dig a hole about 12 inches deep and 12 inches wide in the area you’re testing.
- Fill the hole with water and let it drain completely — this saturates the surrounding soil.
- Fill the hole with water a second time and time how long it takes to drain fully.
Well-draining soil typically drains at a rate of about one to two inches per hour. If water is still standing after several hours, you’re dealing with a drainage problem, likely caused by compacted or heavy clay soil, that will need to be addressed before planting anything that isn’t specifically water-tolerant.
Step 3: Test Soil pH
Soil pH measures how acidic or alkaline your soil is on a scale of 0 to 14, with 7 being neutral. Most vegetables, herbs, and ornamental plants prefer a slightly acidic to neutral range, generally between 6.0 and 7.0, though some plants — like blueberries, which prefer more acidic soil, or lilacs, which tolerate more alkaline conditions — have their own specific preferences.
pH matters because it directly affects nutrient availability. Even when nutrients are technically present in the soil, an imbalanced pH can chemically “lock” them up, making them unavailable to plant roots. This is why correcting pH is often the single highest-impact fix for a struggling garden bed, even when nutrient levels look adequate on paper.
How to Test pH at Home
A few options exist depending on how much precision you need:
- Home pH test kits using color-changing chemical strips or liquid reagents are inexpensive and give you a general reading within a point or two of accuracy — sufficient for most home gardening decisions.
- Digital pH meters are inserted directly into moistened soil and give a faster, often more consistent reading, though cheaper models can drift out of calibration over time and benefit from periodic checking against a known solution.
- Lab testing through your local cooperative extension office gives you the most accurate and detailed results, often including a full nutrient breakdown alongside pH, typically for a modest fee.
For best results with any home kit, take samples from multiple spots in the garden and at a consistent depth (usually 4 to 6 inches), since pH can vary meaningfully across even a small yard.
Step 4: Test Nutrient Levels
Beyond texture and pH, understanding your soil’s nutrient profile tells you what your plants have available to work with. The three numbers most commonly tested are nitrogen (N), phosphorus (P), and potassium (K) — the same three represented in fertilizer ratios like 10-10-10.
- Nitrogen drives leafy, vegetative growth and is the nutrient most commonly deficient in garden soil, since it’s water-soluble and leaches out over time.
- Phosphorus supports root development, flowering, and fruit production, and tends to stay in place in soil longer than nitrogen.
- Potassium supports overall plant vigor, disease resistance, and drought tolerance.
Home nutrient test kits are available and give a rough directional read (low, medium, high) for each nutrient, which is often enough to guide basic decisions. For anyone serious about dialing in soil health — particularly for a vegetable garden that’s underperforming despite good watering and sunlight — a lab test is worth the investment. Most university extension labs process samples for a reasonable fee and return results with specific amendment recommendations tailored to what you’re planning to grow, which takes much of the guesswork out of the process.
Where to Send a Lab Sample
In the U.S., your state’s land-grant university typically runs a soil testing lab through its cooperative extension service. A quick search for “[your state] soil test cooperative extension” will point you to the correct lab, sample submission instructions, and current pricing. Fall and early spring are popular times to test, since results come back before your main planting window and any amendments have time to integrate into the soil.
Understanding Your Results
Once you have your results, whether from a home kit or a lab report, here’s how to make sense of the most common findings:
- pH below 6.0 (acidic): Nutrients like phosphorus and calcium become less available. Most vegetable gardens benefit from raising pH slightly toward neutral.
- pH above 7.5 (alkaline): Iron, manganese, and phosphorus availability drops, often showing up as yellowing between leaf veins on affected plants.
- Low organic matter (under 3-5%): Soil will struggle to retain moisture and nutrients regardless of texture, and will benefit significantly from added compost.
- Low nitrogen: Shows up as pale green or yellowing older leaves and stunted growth, especially in leafy vegetables.
- Low phosphorus: Often shows up as poor root development, delayed flowering, or a purplish tint on leaves, particularly in cooler weather.
- Low potassium: Can present as scorched-looking leaf edges, weak stems, and reduced disease resistance.
Lab reports typically translate these findings into specific amendment recommendations (like “add 2 lbs of lime per 100 square feet”), which removes much of the guesswork from the next step.
How to Improve Clay Soil
Clay soil is dense, holds water and nutrients well, but drains slowly and compacts easily, which can suffocate plant roots and make the soil difficult to work, especially when wet.
- Add organic matter consistently. Compost is the single most effective long-term fix for clay soil, since it physically breaks up dense particles and creates pore space for air and water movement. Work in 2-3 inches of compost annually, ideally in fall so it has time to integrate before spring planting.
- Avoid working wet clay soil. Tilling or walking on clay soil while it’s wet compacts it further and can take seasons to undo. Wait until soil crumbles rather than sticking together in a ball before working it.
- Consider raised beds. If clay soil is severe, building up rather than amending down — with a raised bed filled with quality soil — can be more practical than trying to fully transform heavy clay in place.
- Avoid adding sand to clay soil. This is a common but counterproductive fix — mixing sand into clay without enough organic matter can create a texture similar to concrete rather than improving drainage.
- Use gypsum where appropriate, particularly for clay soils high in sodium, since it can help improve structure without significantly affecting pH, though it’s less universally beneficial than organic matter.
How to Improve Sandy Soil
Sandy soil drains quickly and warms up fast in spring, which can be an advantage for early planting, but it struggles to hold onto water and nutrients, both of which wash through quickly.
- Add organic matter generously and often. Compost, aged manure, and leaf mold all help sandy soil retain moisture and nutrients far better, and because sandy soil breaks down organic matter faster than clay, it typically needs more frequent additions.
- Mulch heavily. A thick layer of organic mulch reduces evaporation and helps regulate soil temperature, both of which matter more in fast-draining sandy soil.
- Water more frequently but consider soil amendments before increasing water volume. Rather than compensating entirely with more frequent watering, building organic matter addresses the underlying retention problem rather than just the symptom.
- Consider cover crops in the off-season, since their root systems help build soil structure and organic matter simultaneously.
How to Adjust Soil pH
If your test results show a pH outside the ideal range for what you’re growing, correcting it is a gradual process best done over one or more seasons rather than all at once.
To Raise pH (Make Soil Less Acidic)
Adding agricultural lime (ground limestone) is the standard method for raising pH. The amount needed depends on your current pH, target pH, and soil texture — clay soil requires more lime than sandy soil to achieve the same pH change, since it has a greater buffering capacity. Lab test results typically include a specific recommended application rate; without one, follow package directions and retest after a season rather than guessing at a larger dose upfront.
To Lower pH (Make Soil More Acidic)
Elemental sulfur is the most common amendment for lowering pH, working through soil bacteria that convert it to sulfuric acid over time — a process that’s more effective in warm soil and can take a full season to show significant results. Aluminum sulfate acts faster but is generally used more cautiously, since overapplication can introduce excess aluminum, which is toxic to plant roots at high concentrations.
In both directions, patience matters. Overcorrecting by adding too much amendment at once can swing pH too far in the other direction or damage soil biology, so smaller, incremental applications with retesting between them are the safer approach.
Building Long-Term Soil Health
Beyond correcting specific deficiencies, a few ongoing practices build resilient, healthy soil over time regardless of your starting point.
Compost Regularly
Working finished compost into your beds every season is the single highest-leverage habit for soil health. It improves structure in every soil type, feeds beneficial soil microbes, and slowly releases a broad range of nutrients as it continues to break down.
Minimize Tilling
Excessive tilling disrupts soil structure, destroys the fungal networks that help plants access nutrients and water, and can accelerate organic matter breakdown. A no-till or low-till approach — adding compost to the surface and letting soil organisms incorporate it naturally — tends to build healthier soil over the long run than annual deep tilling.
Keep Soil Covered
Bare soil is vulnerable to erosion, moisture loss, and temperature swings. Mulching exposed soil, or planting cover crops in beds that would otherwise sit empty over winter, protects and often improves soil between growing seasons.
Rotate Crops
Planting the same crop family in the same spot year after year depletes specific nutrients that family relies on and allows soil-borne pests and diseases specific to that family to build up. Rotating crop families through different beds each season helps maintain more balanced nutrient levels and reduces disease pressure.
Avoid Compaction
Foot traffic and heavy equipment compress soil, squeezing out the pore space that roots, water, and air depend on. Defining permanent pathways, using raised beds, or simply being mindful about where you step protects soil structure that took real effort to build.
Common Soil Testing Mistakes to Avoid
- Testing only one spot. Soil conditions can vary significantly across even a small yard, especially near structures, trees, or areas with different drainage. Combine samples from several spots for a more representative result.
- Testing right after fertilizing or amending. This skews results and doesn’t reflect your soil’s baseline condition. Wait at least a few weeks after any amendment before retesting.
- Sampling too shallow. Surface soil dries out and changes faster than soil a few inches down, where most root activity happens. Sample at a consistent 4-6 inch depth for the most useful results.
- Making large corrections all at once. Whether adjusting pH or adding nutrients, dramatic single applications are more likely to overcorrect than gradual, tested adjustments.
- Ignoring organic matter in favor of just N-P-K. A soil with perfectly balanced nutrients but very low organic matter will still struggle with moisture retention and long-term fertility. Organic matter is worth tracking alongside nutrient levels.
Frequently Asked Questions
How often should I test my garden soil?
Testing every one to three years is generally sufficient for an established garden, though it’s worth testing any time you’re starting a new bed, notice plants consistently underperforming, or have made significant amendments and want to confirm they worked.
What’s the best time of year to test soil?
Fall or early spring are ideal, since results come back before your main planting window and amendments like lime or compost have time to integrate into the soil before it’s needed.
Can I improve soil in one season, or does it take longer?
Texture and organic matter improvements are gradual and typically take multiple seasons of consistent compost addition to meaningfully change. pH adjustments can show partial results within a season but often take a full year or more to fully stabilize, especially in clay soil with high buffering capacity.
Do I need a professional soil test, or is a home kit good enough?
Home kits are perfectly adequate for general guidance and catching major issues. A lab test is worth the modest cost if you’re dealing with a persistent, unexplained problem, starting a significant new garden area, or want precise amendment recommendations rather than general ranges.
Is compost alone enough to fix bad soil?
Compost addresses organic matter, structure, and provides a broad range of nutrients, which resolves a large share of common soil problems. However, it won’t correct a significantly imbalanced pH on its own, so a soil test is still worth doing to catch issues compost can’t fully address.
Final Thoughts
Good soil isn’t something you achieve once and forget about — it’s an ongoing relationship built through regular testing, thoughtful amendments, and consistent habits like composting and mulching. The good news is that soil responds reliably to the right inputs: understand what you’re working with, correct what’s off, and maintain it with organic matter over time, and most other gardening challenges become noticeably easier to manage.
If you haven’t already, start with a simple jar test and a basic pH kit this week — it takes less than an hour and gives you the foundation for every other decision you’ll make in the garden this season. For the full picture of what comes after your soil is in good shape, revisit our Complete Gardening Guide for guidance on plant selection, watering, feeding, and seasonal care.
Also Read: Vegetable Gardening for Beginners: What to Plant and When